Introduction
Hello Friends,In this blog we talk about how to install Xamarin in our local system(like P.C.,Computer System etc.).Xamarin is as a technology of Microsoft which is very useful to create cross platform applications.Now,In further reading we understand how to install this technology and use step by step.
Steps For Install Xamarin:.
1 Install Visual Studio 2017:
there are two type of visual studio which are use for Xamarin app development which are visual studio and visual studio for mac
- Visual Studio is use for installing visual stdio in windows platforms whereas the Visual studio for mac is use for apple specific devices i.e. mac platforms.
- Visual studio for mac is mainly targets the Android,IOS and Universal windows platform specific apps where the Visual Studio for mac is mainly targets the Android,IOS and MacOS specific apps.
- Step are as follows:
- Go to visual studio official site i.e. from here.
2. Download the visual stdio as your requirment in your system.
3. Now you get the visual studio installer run that application in your system then you get the window:
4. Now you can choose packages as your requirements but today our requirement is only install Xamarin so please check these packages:
- Mobile development with .NET.
- .NET destop development(For windows Development)
- Universal Windows Platform development(For windows development)
5. Now Install these package in your Visual Studio.
6.Check the update in your Visual Studio framework and if they are exist then download them.you can check update as follows:
- For Visual studio for windows:go to Tools>Extensions and Updates....
- For Visual Studio for mac: go to Visual Studio>Check for Updates...
2 Install Xcode:
This step is only for mac specific system and this step is must for iOS specific app development
- Go to official site for install Xcode i.e.from here
- Now download the Latest version of Xcode from the site and install it in your macOS based system.
3 Develop iOS based App in Visual Studio for Windows:
Now,this is some logical step for genrate iOS based app in Visual Studio for Windows you can understand from these points:
- Every Application, which is to be runnable in macOS based system(i.e. iOS phone,pad,laptops etc.) must be develop through Xcode which use swift language.
- So,For develop iOS based app in Visual Studio for Windows, you can use mac agent.
- For mac agent,at least one macOS based system should be connect to your Windows based local system Network then you just Remote Login your System to macOS based system.
- then you create create iOS based system in Visual studio for Windows.
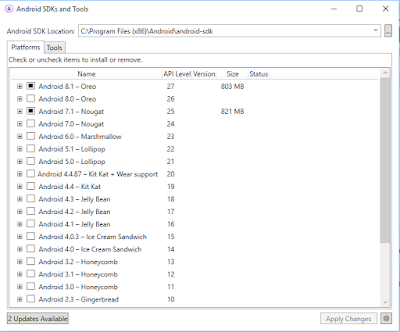
4 Download Android SDK:
Android SDKs in very important for building an android OS based application.The Android apk is constructed from java SDK,Android SDK and .NET SDK.
- Open android sdk manager,go to Tools>Android>Android SDK Manager...
- then now choose the latest android Sdk and install it,choose these terms in tool Section:
- Android SDK Tools
- Android SDK Platforms-Tools
- Android SDK Build Tools(choose the latest version).
- Now download latest Platform in platform section.
5 Installing Emulators:
Emulators are the virtual mobiles which are use for testing purpose and run in local machines.these are act as a same as a physical mobile.
- iOS Emulators
- iOS Emulators are genrated and run through Xcode which is use by xamarin for testing iOS Emulators supports rotation,ScreenShot capturing and pressure sensors etc.
- iOS Emulators can be usable in Visual Studio for Windows through remote mac egent but in reality it work in mac System.
- Android Emulators
In Previous section,we download all SDK so here we just download emulators and setting up them.
-
In android Sdk Manager,go to Tools Section and check android emulator.
-
then now open Android Device Manager.go to Tools>Android>Android Device Manager...
-
Now,you will get a Android Device manager screen
-
here,you can manage all device which you are already created and create new devices and set the specification as you need
-
here specify all configuration of your emulator then click create button
-
Now your emulator is ready for testing your xamarin App.
In android Sdk Manager,go to Tools Section and check android emulator.
then now open Android Device Manager.go to Tools>Android>Android Device Manager...
Now,you will get a Android Device manager screen
here,you can manage all device which you are already created and create new devices and set the specification as you need
here specify all configuration of your emulator then click create button
Now your emulator is ready for testing your xamarin App.


No comments:
Post a Comment